How to setup your own private, secure, free* VPN on the Amazon AWS Cloud in 10 minutes
UPDATE: 1st May 2018, new L2TP system is used which is more reliable. YAML configuration is used going forward instead of JSON. You can read more about it on our webdigi github page.
NOTICE: 2nd June 2017, we had comments from a few users that some new AWS accounts take a few hours before the account can be activated to use this service.
UPDATE: 15 November 2016, use L2TP over IPSEC instead of PPTP for added security, macOS Sierra support.
UPDATE: 19 September 2016, Added the new AWS Mumbai region also.
So, we all know the benefits of using a VPN like privacy, anonymity, unblocking websites, security, overcoming geographical restrictions and so on. However, it has always been hard to trust a VPN provider who could potentially log and intercept your internet traffic! Launching a private VPN server will give us the best of what a VPN truly offers. This guide will walk you through all the steps to running your own VPN server in about 10 minutes.

Advantages of a Private VPN Server
Simple: Non-techies should also be able to follow this guide easily.
Quick: 10 minutes is all it takes to follow this guide and create a private VPN server.
Private: Dedicated VPN server for your use only.
Secure: Encrypted & password enabled VPN server with no logs.
On demand: You can start / stop the VPN server as required.
Global: One or more VPN servers in 14 worldwide regions (including London, US, Tokyo, Singapore, Seoul, Canada).
Device support: Supports PPTP and L2TP with IPSEC which means you can use the VPN server on your Android, iPhone, iPad, PC, MAC, and even most routers (to support Apple TV, Chromecast).
Open source: Review / contribute to this project https://github.com/webdigi/AWS-VPN-Server-Setup
Free: New Amazon AWS customers have a free tier server for the first year.
Creating your Private VPN Server
Visit http://aws.amazon.com/free/ and complete the signup. If you already have an Amazon AWS account then please login and follow on.
2. Select a region for your VPN server.
The VPN server can be in the following locations – North Virginia, Oregon, California, Ireland, Frankfurt, Singapore, Tokyo, Sydney, São Paulo. All your traffic will flow through the region that your VPN server is hosted. The selected region will appear in bold next to your name on the top header bar.
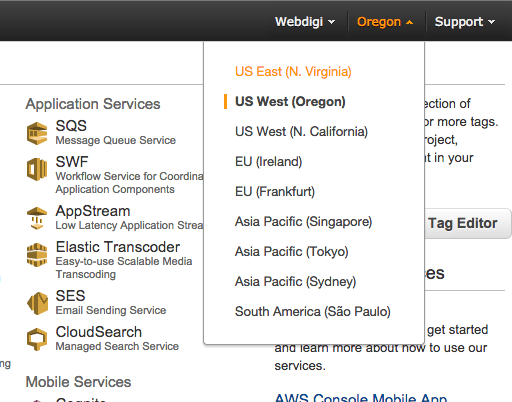
3. Open CloudFormation in the Amazon AWS control panel.
You can follow this link or click on the cloud formation link from the AWS page.
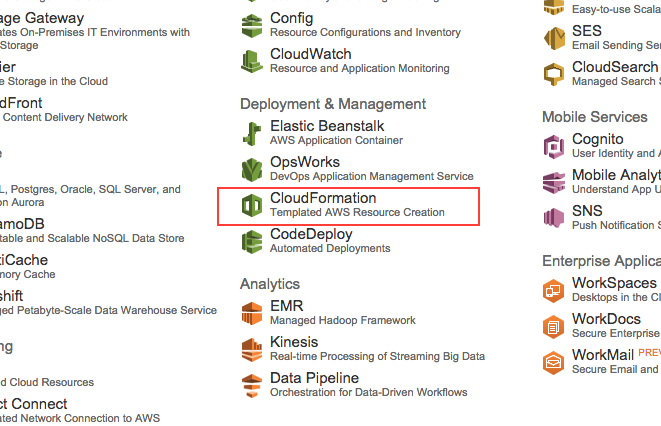
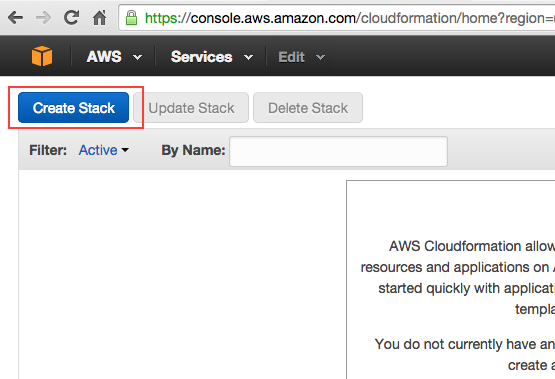
4. Start creating a stack with CloudFormation. Click on “Create Stack” button on top of the page.
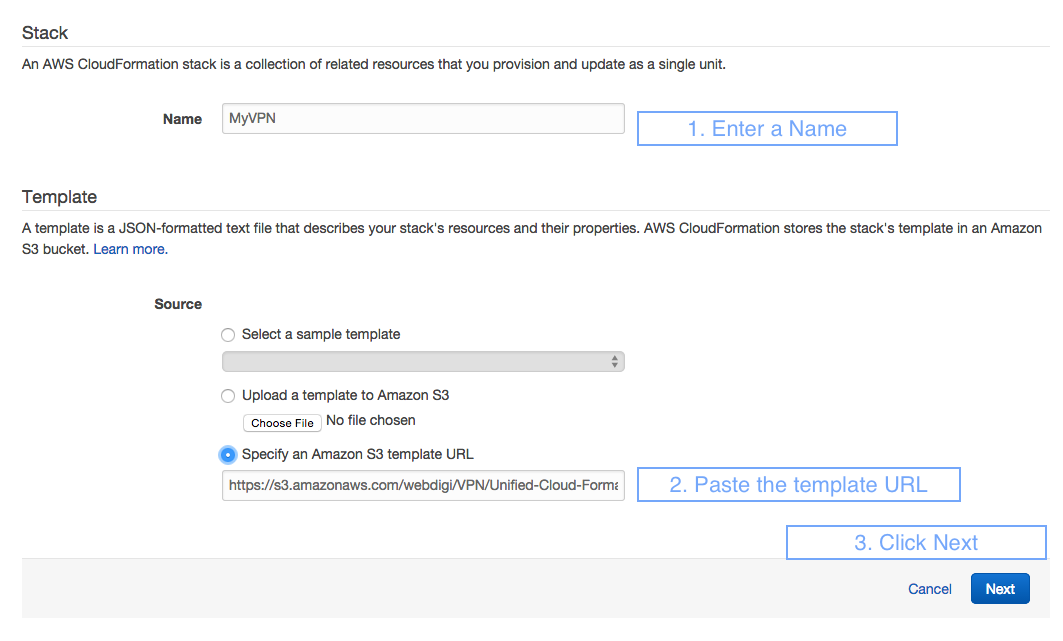
5. Setting up the template for the stack
Enter a stack Name say MyVPN (you use what you like). Then under Template, Source, select “Specify an Amazon S3 template URL” and paste in this URL https://s3.amazonaws.com/webdigi/VPN/Unified-Cloud-Formation.yaml and then click Next.
6. Setup VPN access details in the Specify Parameters page
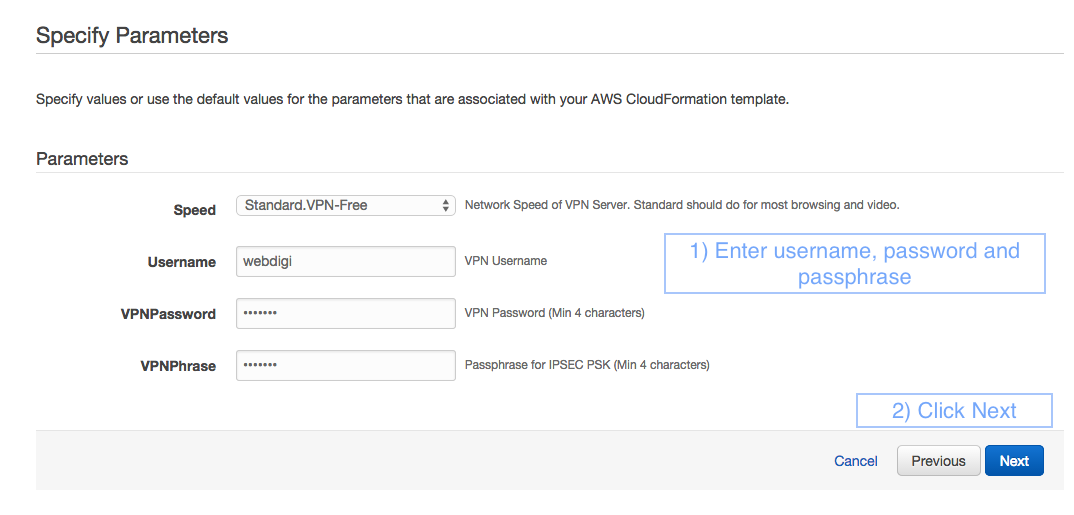
Speed: Select Standard.VPN-Free and this should do for most use cases. We have also added faster server options if you ever require VPN with multiple simultaneous video streams and so on.
Username: VPN username for your VPN server.
VPNPassword: VPN password for your VPN server.
VPNPhrase: VPN passphrase the L2TP – IPSEC connections on your VPN server.
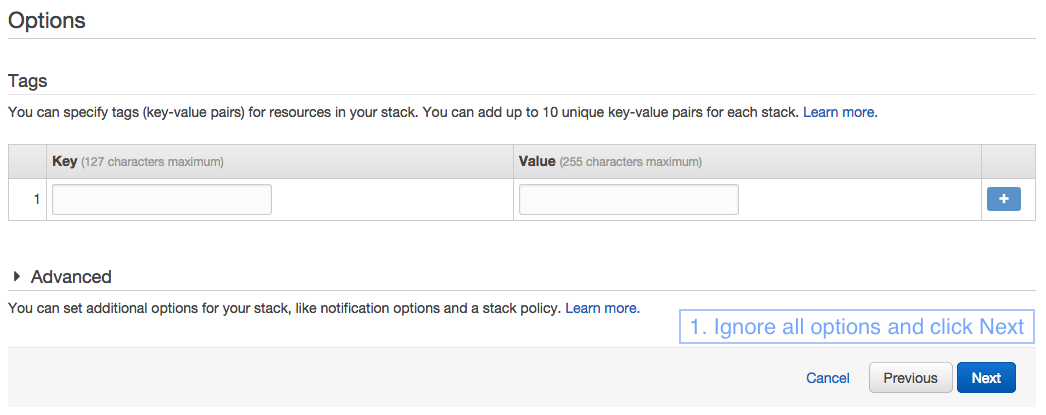
7. You will then be taken to the Options section and you can click Next without having to fill anything on this page.
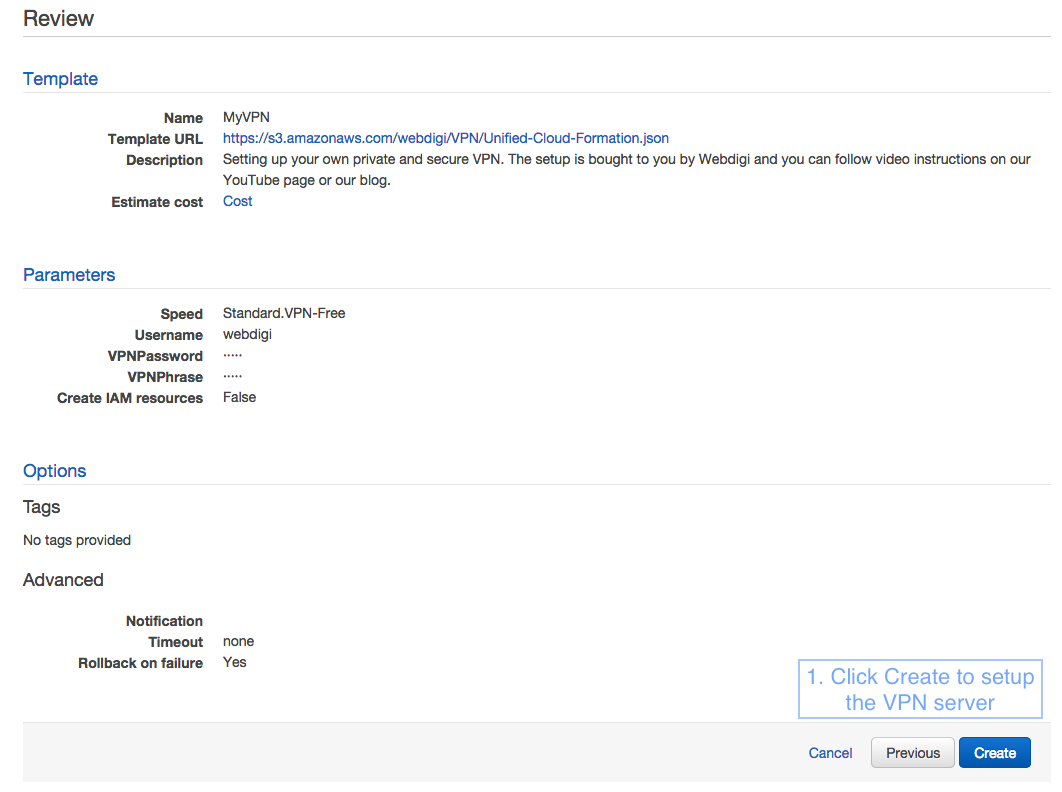
Finally, you will see a review page as in the screenshot below. Just click on Create and the VPN server will be created in a few minutes.
8. Monitoring the VPN server creation
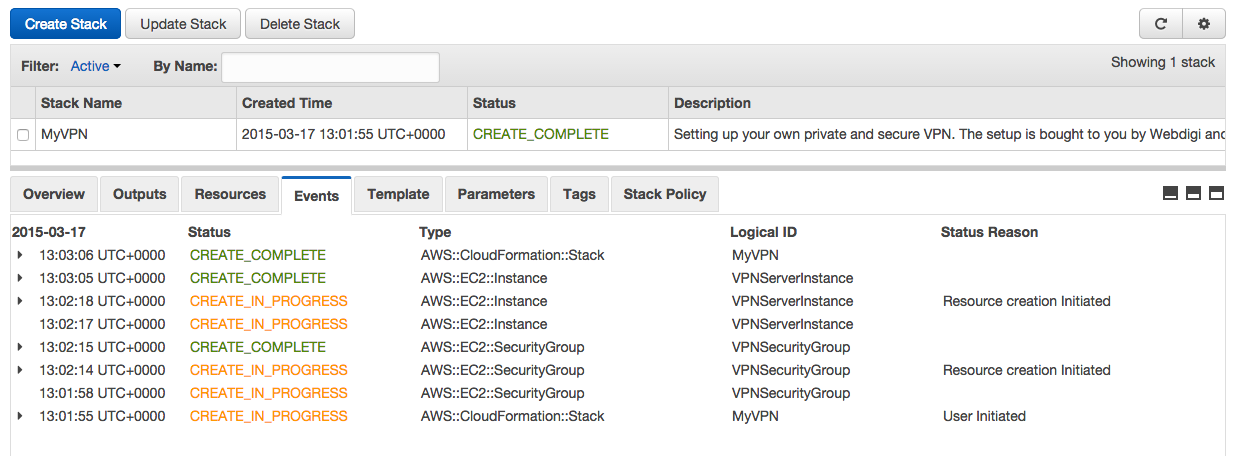
You will see a page which shows that the status is Create in progress as below.

Within about 2 minutes you should see that the stack create in progress is complete as below.
9. Obtain the private VPN server IP address
Once the stack status shows as CREATE_COMPLETE you can then click on the Outputs tab.

Now in the outputs tab you can see the server IP address as highlighted below.

Awesome, you should now have your private VPN server running in the IP address shown in the outputs tab. Please note that the IP address is unique for your server and you need it to connect your devices. Now your VPN server is ready and let us connect to it.
Connecting to your private VPN server
Each device has its own configuration to connect to a VPN server. We have added a how to for a few popular devices below. Please note that your private VPN server supports both PPTP and L2TP with IPSEC. This means that your VPN server supports most devices out there including older routers. You can connect to your VPN server with either PPTP or L2TP as supported by your device.
The parameters for your VPN connection are
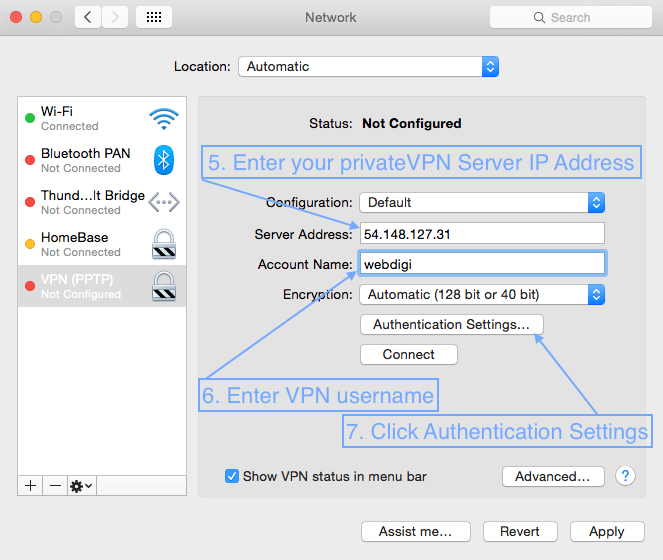
Server Address: The IP address from step 9 and this is unique for your VPN server.
VPN Username & Password: From step 6 above. Same username & password for PPTP / L2TP VPN.
VPN Passphrase: You set this up on step 6 above and only have to be used with an L2TP connection.
Examples below use PPTP but you can also find out how to setup L2TP with IPSEC on various websites.
1. Setting up VPN on an Android 5.0
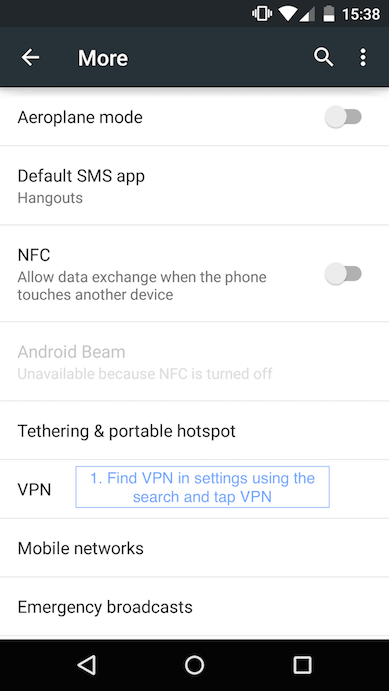
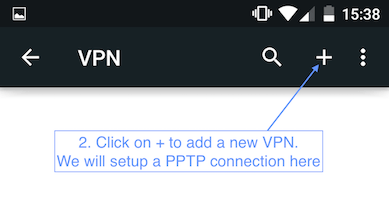
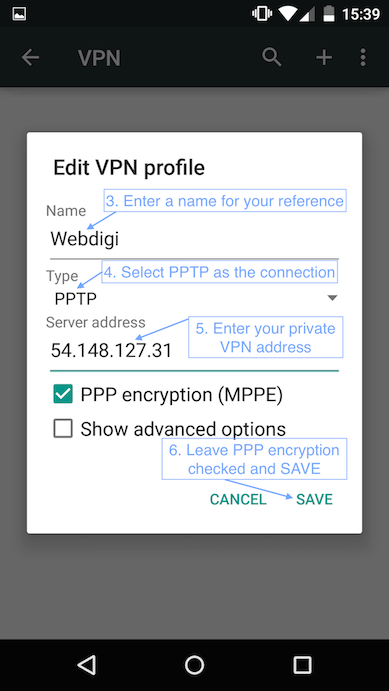
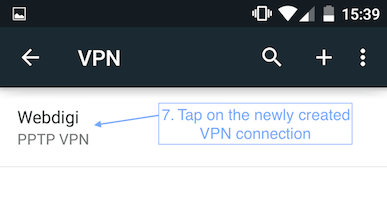
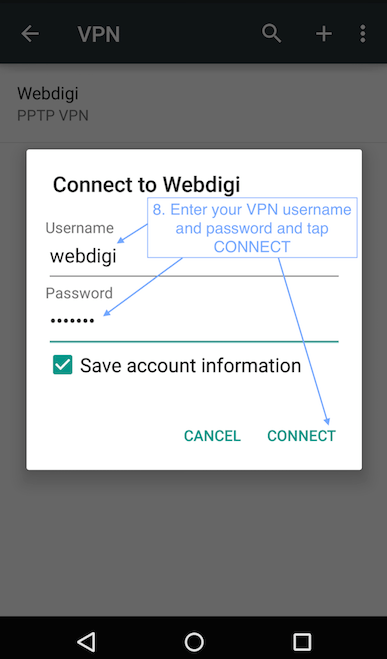
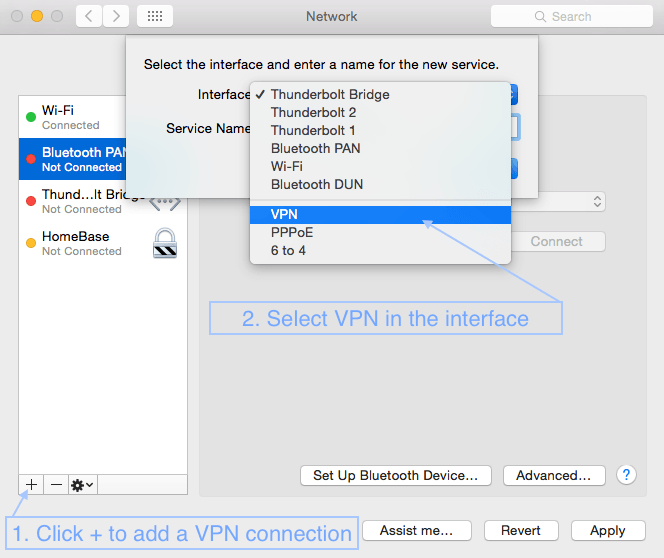
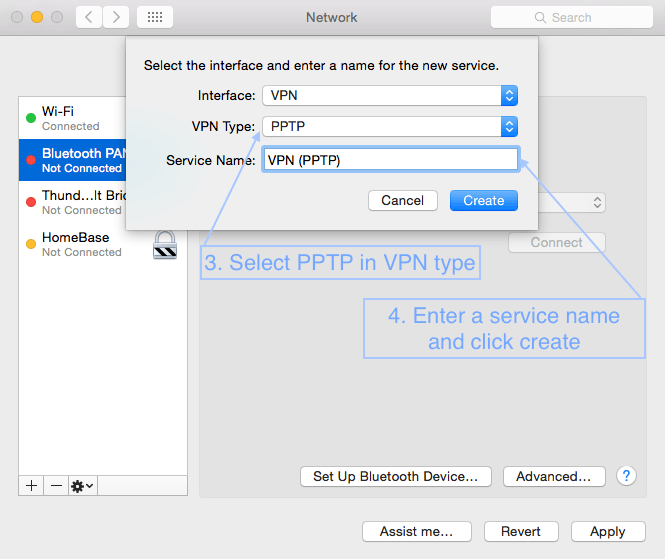
2. Setting up VPN on a MAC with the PPTP connection.
UPDATE Nov 2016: PPTP is not supported on macOS Sierra so follow point 3 using L2TP over IPSEC (below).
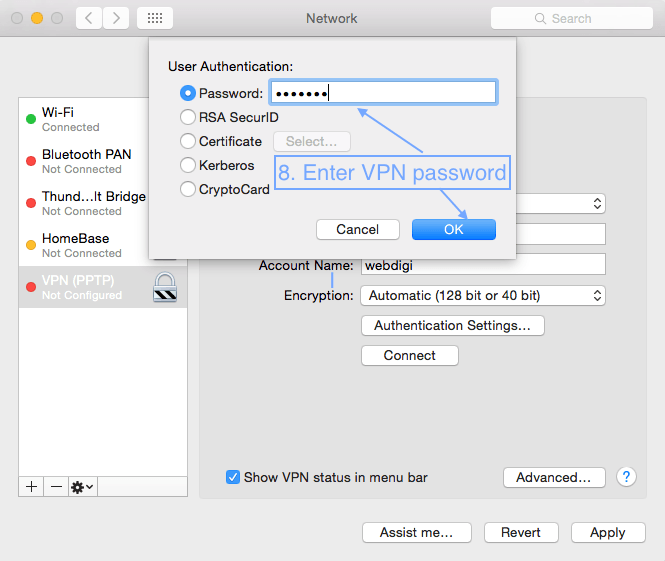
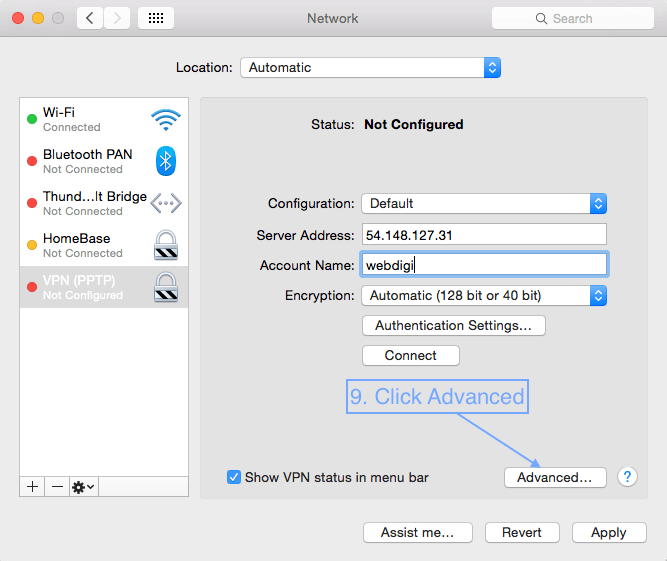
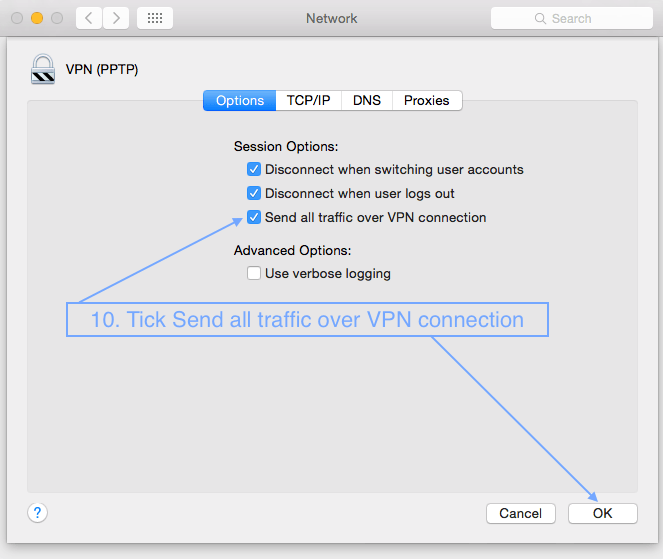
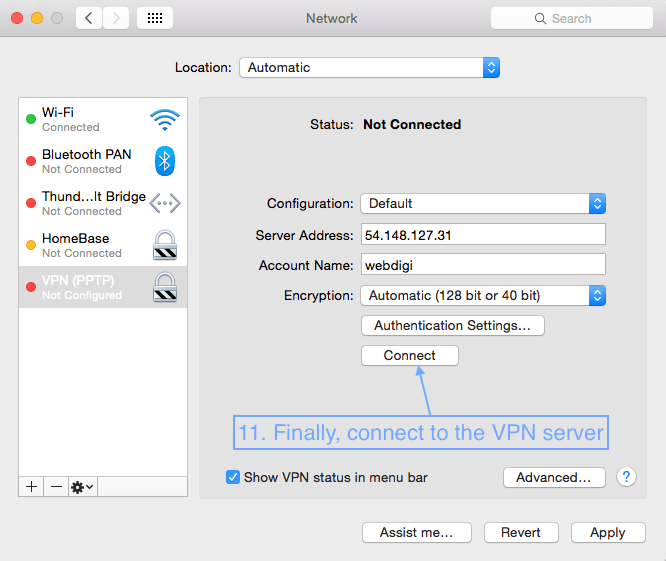
First open System Preferences, then Network and follow the screenshots below.
3. Setting up VPN on a Mac with L2TP over IPSec
UPDATE Nov 2016: L2TP is recommended now. Follow instructions as in PPTP after you setup up to point 8 below.
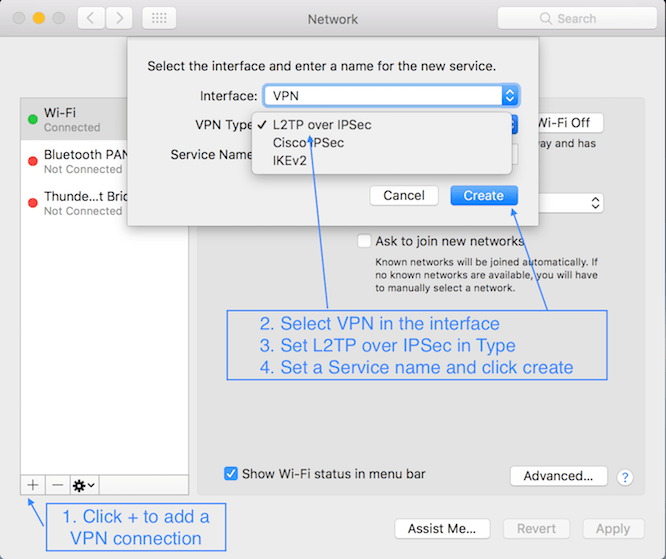
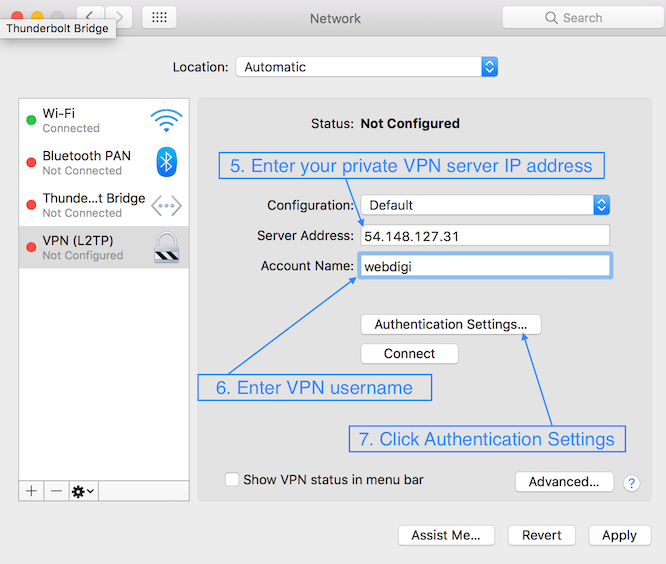
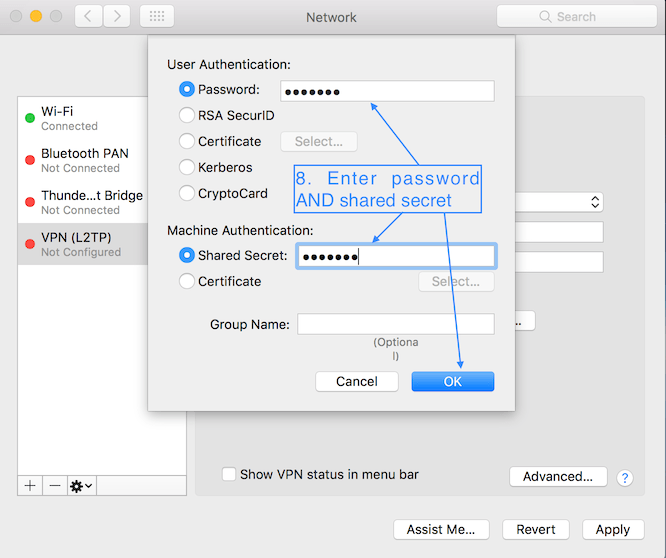
Follow other steps as outlined in the above section on PPTP to finish the setup.
4. Setting up VPN on Asus RT-AC68U router
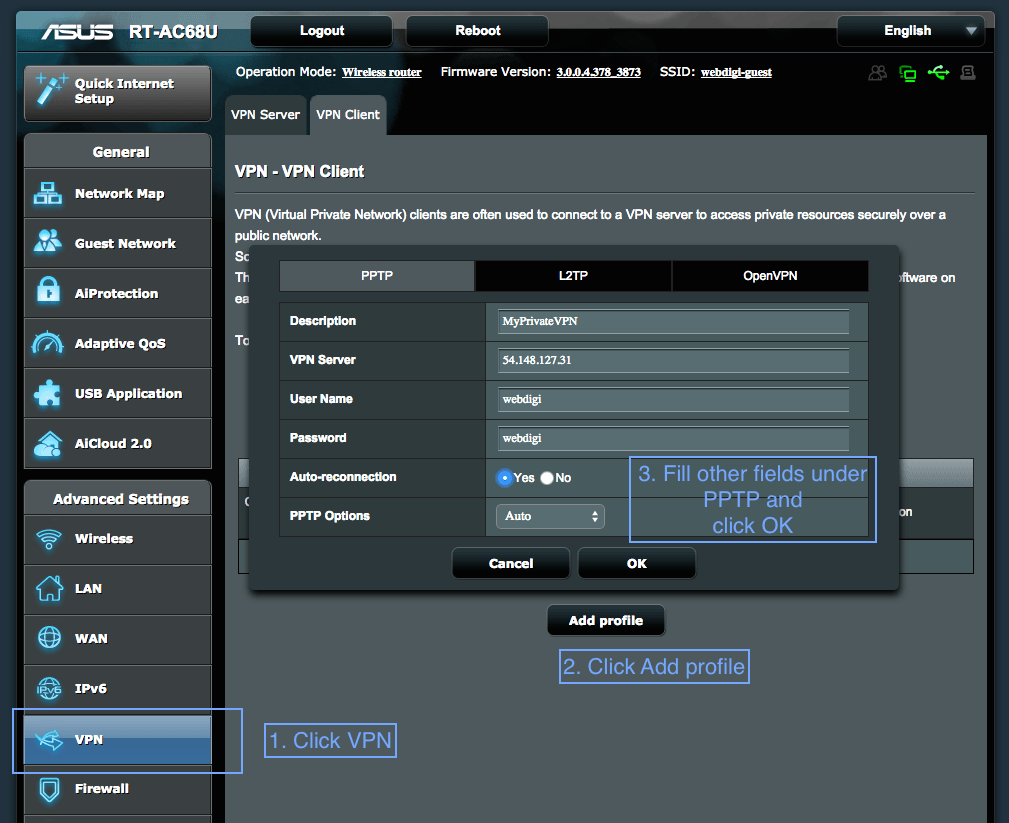
5. For all other devices please search for Setting up PPTP VPN on my iphone and so on. You can also setup an L2TP IPSEC VPN which is more secure but might not be supported on all devices.
Tips / Suggestions
1. If you want to delete your VPN server then just open CloudFormation on AWS. Make sure you select the same region that you created your VPN server. Then just click on Delete Stack button and your private VPN server will be removed.
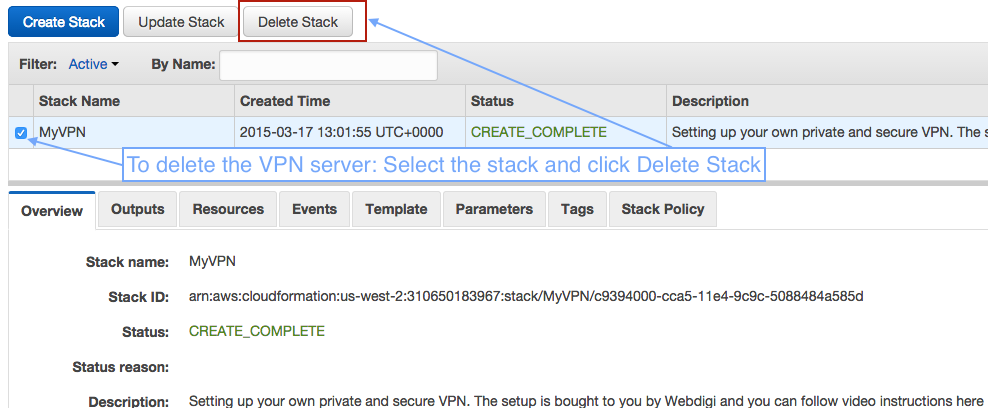
2. You can have multiple VPN servers all over the world. You just have to repeat the setup steps in this guide by selecting different regions. Please note that AWS free tier gives you a total of 750 hours a month free. You can also delete and create VPN servers as frequently as you want.
3. Setting up a VPN connection on your router will allow all devices on its network to use the VPN server. This could be beneficial for use with AppleTV / Chromecast and any device that does not support a VPN.
4. You can test if your VPN connection is active by just searching for “what is my ip address” on your favourite search engine. The IP address reported will be that of your private VPN server if everything is your connection is enabled. If your VPN connection is not enabled or if the VPN server settings are not complete then it will report your ISP’s IP address.
5. We love your feedback and let us know if you face any issues in the comments section below or on our github page for setting up your private VPN on AWS.
Awesome. It was quick to set it up with the standard free VPN in US Oregon. Just curious on what is the charge for the high speed and ultra vpn server with Amazon?
Good to know. Have a look at the AWS pricing for more details https://aws.amazon.com/ec2/pricing/
Standard free uses the t2.micro which is free for the first year. You should find it suitable for most use cases. High speed uses t2.medium which is $0.052 per hour and Ultra high speed uses m3.xlarge which is $0.280 per hour. You only need to go in for the non standard free server if you have 4k video streams or multiple video streams and so on.
Nice tutorial. PPTP has been broken and it’s least secure. why not use OpenVPN?
PPTP is easy to setup on most devices and should be sufficient to watch videos and so on. The steps above also add L2TP service along with PPTP on the server. You can connect to it with L2TP IPSEC for more secure access requirments.
if only I had known before spending 50€ to bypass school’s firewall…
Pingback: How to setup your own free* VPN server on the Amazon AWS Cloud in 10 minutes | Reddit Spy
Amazon is a U.S. Tech giant. As if the U.S. Government would let them operate without NSA back doors. Collocation of your own encrypted secured server under a false name and anonymous payment is a truly safe route
As if the NSA can’t tap slightly “upstream” of your privately owned equipment. Anyway, maybe hiding from the NSA isn’t the only reason to use a VPN.
Setting up on demand VPN server in multiple regions like US, Singapore, Tokyo, Europe looks good.
Significantly cheaper than paying AT&T $30 a month to not sell my data.
Thank you for this great tutorial. I managed to setup L2TP IPSEC connection on my Netgear R7000
Is the AWS server as configured in this well documented tutorial an on-demand server that is running only when you connect to it?
Not connecting on my own Asus RT-AC68U router.
keep getting this in the logs.
Mar 24 17:01:14 pptp[1822]: CHAP authentication succeeded
Mar 24 17:01:17 pptp[1822]: Connection terminated.
Mar 24 17:01:17 pptp[1822]: Modem hangup
does it work when you connect to it from your mac / pc / phone?
Yes it works on my phone (Android 4.4.4)
Had my WAN configured wrong. Working now
I am typing this comment using the VPN on AWS i just created. Thanks.
Also, Is this theme public?
Sounds good. I can see your IP as an AWS Amazon IP so you are through on the VPN!
This great. It took a few minutes for the Amazon account to get set up and I initially got errors, but finally it eventually worked. So, if you are setting up an AWS account for the first time, you’ll need to wait about a half hour before setting up the VPN.
Good stuff. I wrote a book on overseas streaming using AWS and published on Amazon but I used the OpenVPN AS appliance. It is rock solid and I use it on my E4200 DD-WRT and RT68U Tomato installs with selective routing. The OpenVPN client for iOS and Android is solid too.
I might play around with CloudFormation for OpenVPN to make easier. I do think that OpenVPN is a better option over PPTP and L2TP…depending on your needs of course.
Great tutorial mate… I looked at the different protocols used. Currently OpenVPN is by far the most secure and if you use it in UDP fast enough for streaming. I’d rate L2PT/IPsec as relatively secure with PPTP clearly broken
However, I think the security you need very much depends on what you are trying to accomplish. For most applications even the broken PPTP is sufficient, for example securing a public Wi-Fi connection, and often any encryption is better than none. That said, sometimes a device’s limitations may dictate which protocol to use…
Great work; one question – What would be the cost of continuing the Amazon AWS cloud service beyond the free first year for the average VPN personal user?
Thanks !
Cost of AWS instance after free tier is $9.50 per month. This is an on demand server so you can start and stop the server whenever you need it. Just delete the stack and create the stack again as per instructions above to start and stop your VPN server.
Thanks for the answer 🙂 It’s a little expensive after the free tier (compared to what I’m paying now) but it’s a great option for those that want to be in the driver’s seat and create a quality VPN.
This sounds great! What are Amazon’s typical fees for a VPN connection after the free year of VPN is finished?
I get the following error while the stack is being created:
The specified instance type can only be used in a VPC. A subnet ID or network interface ID is required to carry out the request.
Did you create a new amazon account? You might be trying with an existing AWS account and previously deleted your default VPC. Can you please try creating the server in another region? Each Region has its own VPC.
Oddly I can’t reach the public IP. I tried telnetting to it on port 500 and port 1723 (the open ports based on the VPN security group that was created) and neither will connect. Anyone have any ideas?
I had better luck by stopping/starting the instance and getting a new public IP. Oddly PPTP “works” (it connects, but I’m getting no DNS/etc), and L2TP over IPSec is not working at all (not connecting).
All VPN ports are automatically opened if you follow the steps. Please wait about 5 minutes after you get the public IP and try to connect again. You can always delete the stack and create it again.
This is a thing of beauty. I started it and it seemed to be working fine but then disconnected after about a minute. However once I re-connected it’s seemed stable. Just a point of info in case others are seeing similar.
Thanks for your comment. Can you please confirm which region you have used, where you are located and finally if you are using PPTP / L2TP.
PPTP, and via Frankfurt (to California). It still disconnects fairly regularly – I just grabbed a utility that re-connects but somewhat cumbersome.
is there a reason the URL for VPN Template has “webdigi” sub? doesn’t amazon have its own vpn template to use?
thanks!
-alex
The VPN template uses the default Amazon VPC on your account and does not create a webdigi sub.
When I try to connect via the Network panel on OS X, I get this error: “The PPTP-VPN server did not respond. Try reconnecting. If the problem continues, verify your settings and contact your Administrator.”
When I try to connect via Viscosity on OS X, I am unsure what port to use (default is 1194?), authentication is by CA/Cert/Key, not username/password, so I can’t seem to get Viscosity set up.
Any guidance would be appreciated.
Can you try PPTP connection from your mobile or another device.
Also, please also wait for 5 minutes after the server has started and you have the public IP address in the cloudformation output tab.
Question regarding connecting with a moto x running android 4.4.4. I configured the VPN (thanks for the guide!), I made sure it works because I connect with it over my mac, but it won’t connect using my android phone. I put everythign in correctly, set it up using PPTP, and when I tell it to connect, it tries connecting then disconnects. Any idea how to get around this? Thanks!
Hey Tim,
I’m also having issues getting this to work with an Android device. Did you have any luck?
I’m seeing a red CREATE_FAILED error
See events output here: http://imgur.com/tN5Txim
Any ideas?
Please try another region. It looks like you have deleted your standard VPC provided by Amazon.
Do you have a default VPC it might have been deleted? Please try and change your region and try.
I have been trying to get this working with Vyos I think I’m close but missing something. Part of my issue might be that I’m behind a NAT gw but Vyos has a dedicated nat IP .88 (not PAT) which I think should work as long as the vpn initiates from inside.
Cisco NAT IOS device
iroute#sh ip nat translations | include 172.31.21.2
udp xx.xx.xx.88:500 172.31.21.2:500 52.17.9.146:500 52.17.9.146:500
udp xx.xx.xx.88:4500 172.31.21.2:4500 52.17.9.146:4500 52.17.9.146:4500
Thanks for the information. I hope it will be helpful for us.
Enabling SSH access. Could you tell me what I need to change in the cloudformation template for it to give me an option to attach a key pair to ssh in to the instance. I have enabled inbound on port 22 in the security group, but AWS tells me I don’t have a key pair attached
You could edit the cloudformation template to add the key pair to the instance. Alternatively, you could create a new EC2 instance from the AWS website and then SSH to it and execute the commands via SSH. Please raise an issue on our github page if you like more information.
how to configure my VPN server to be able to connect my VPN CLIENT to VPN SERVER via configurable UDP ports?…anyone?
Hi,
Question about the “free” tier. I see it is free for the first year. You suggest in one of the comments to delete it and recreate it after a year. By deleting it and recreating it, will you be able to keep it free indefinitely? Or, will you be forced to pay the $9.50/month after the first year? Since the title of the article is “free” I was hoping it would continue to be that way, but maybe the free is only for the first year. If you could clarify, that would be greatly appreciated!
-Mark
I’m curious about that as well. Also, are there any other fees? The server is $9.50, but what about the data?
Pingback: Thursday Threads: Library RFP Registry, Transformed Libraries talk at IMLSfocus, DIY VPN | Disruptive Library Technology Jester
Nobody here mentions that the free TIER has a 50GB monthly bandwidth limit??? approx 1 GB per day? more or less good for nothing in todays media heavy world….
Can someone shed some light on this please….free tier monthly bandwidth limits…
== Settings for a router with DD-WRT ==
Go to Setup -> Basic Setup
Connection Type: PPTP
Use DHCP: Yes
Gateway: [ip address of your proxy server i.e. the VPN server, e.g. Amazon Cloud’s where you’ve got your server – public IP]
Username: [your VPN username]
Password: [your VPN password]
MPPE Encryption: [Enable]
Packet Reordering: [Disable]
Dual-Access Mode: [no]
Connection strategy: Keep Alive: Redial Period 30 seconds
PPTP encryption: [Enable]
Additional PPTP Options: mppe required,stateless [type it like this, no space between required and stateless – just a comma]
STP: [Disable]
Optional settings: [leave blank – mine has MTU as Auto 1460 – which I have left]
Router IP
Local IP Address: [IP address of your VPN router in your house]
Subnet Mask: 255.255.255.0
Gateway: 0.0.0.0
Local DNS: 0.0.0.0
Network Address Server Settings (DHCP)
Type: DCHP Server
Server: [Enable]
Use DNSMasq for DHCP: [leave unchecked]
Use DNSMasq for DNS: [leave unchecked]
DHCP-Authoritative: [leave unchecked]
Other things:
– Go to “Services” at top of page, click on VPN, all the VPN should be disabled.
– Check that there is no firewall or startup script rules (go to Administration section -> then Commands)
– Check in “Security” section, then “VPN Passthrough”, to verify that PPTP Passthrough is disabled
Finally, go to Status -> WAN -> connect
Wait 10 seconds – and then it should work – open google and type “what’s my IP” to check